


Table of contents


No headings in the article.
Smart contracts on the StarkNet ecosystem are powerful tools for building decentralized applications. However, without a user interface, they can be challenging to interact with. This is where the Starknet-React library comes in. With its user-friendly hooks, developers can easily integrate their smart contracts with a beautiful and intuitive user interface. But we understand that finding resources on how to do this can be a challenge. In this article, we will guide you through the process of bringing your smart contract to life.
Our focus will be on integrating a specific ERC20 token contract that has already been deployed on the Starknet testnet. You can access the contract at this address: https://testnet.starkscan.co/contract/0x0432a9138f5c02ed800465cbc0d1376f1c47a17006f17a3ab75a9ad5746611ae#read-contract. The codebase for the contract can be accessed via this GitHub repository.
We'll be using Next.js to build the user interface and Starknet-react which exposes the APIs necessary for interacting with our contract. By the end of this tutorial, you will have a better understanding of the technologies required for Cairo contract integration and be able to start building your projects.
To set up our user interface, we will need to install nextjs, chakraUi, starknet-react by using the following command:
npx create-next-app@latest --typescript

yarn add @starknet-react/core

 yarn add @chakra-ui/react @emotion/react @emotion/styled framer-motion
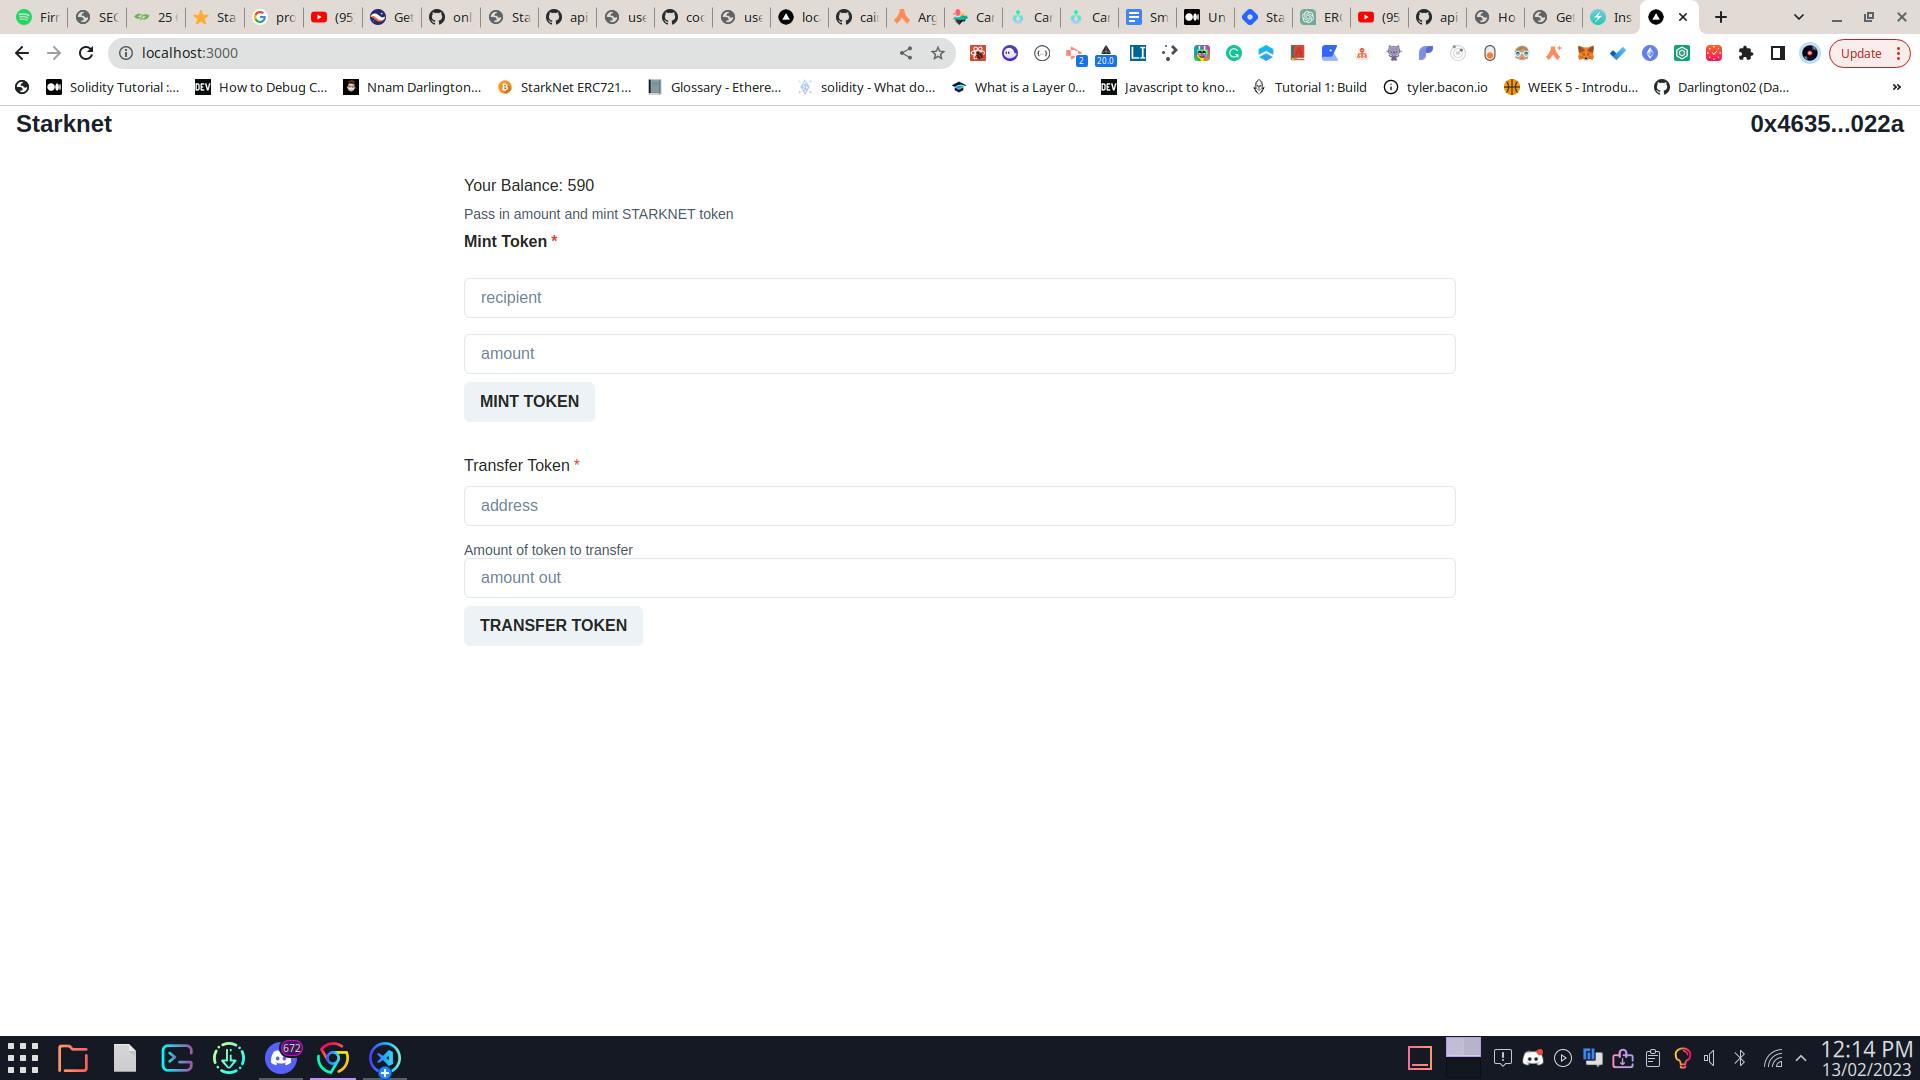
Now that our local environment is set up, we can proceed to design the user interface. The user interface will be a simple interface with the following functionalities:
Rendering the connected address
Input fields to enable the minting and transfer of our ERC20 token.
By the end of this tutorial, you will have a working user interface that can be used to interact with the ERC20 token contract on Starknet’s testnet.
Below is what the user interface looks like:
_app.tsx
import "../styles/globals.css";
import type { AppProps } from "next/app";
import { ChakraProvider } from "@chakra-ui/react";
import { InjectedConnector, StarknetProvider } from "@starknet-react/core";
InjectedConnector

export default function App({ Component, pageProps }: AppProps) {
  const connectors = [
    new InjectedConnector({ options: { id: 'argentX' }})
  ]
  return (
    <StarknetProvider connectors={connectors}>
      <ChakraProvider>
        <Component {...pageProps} />
      </ChakraProvider>
    </StarknetProvider>
  );
}
The InjectedConnector API is used to specify the wallet that is supported by the dApp, and the StarknetProvider exposes all the available APIs in the starknet-react library. The StarknetProvider should be wrapped around the Next.js component and the connector prop should be passed to the method. This allows the Dapp to interact with the supported wallet and use the APIs from the starknet-react library.
Header.tsx
import { Button, Text } from "@chakra-ui/react";
import React, { useEffect } from "react";
import { useAccount, useConnectors } from "@starknet-react/core";
import { shortenAddress } from "../../web3/helper";

function Header() {
  const { address } = useAccount();
  const { connect, connectors } = useConnectors();
  const connected = !!address;
  // eager connect
  useEffect(() => {
    if (!connectors.length) {
      return;
    }
    connect(connectors[0]);
  }, [connect, connectors, address]);

  return (
    <div className="header">
      <Text fontSize={24} fontWeight={600}>
        Starknet
      </Text>
      {connected ? (
        <Text fontSize={24} fontWeight={600}>
          {shortenAddress(address)}{" "}
        </Text>
      ) : (
        <>
          {connectors.map((connector) => (
            <Button onClick={() => connect(connector)}>Connect Wallet</Button>
          ))}
        </>
      )}
    </div>
  );
}

export default Header;
The component uses the useAccount and useConnectors hooks from the starknet-react library to get information about the currently connected wallet and the available connectors for connecting a wallet. If a wallet is connected, the component displays the shortened address of the connected wallet. If there is no connected wallet, the component displays a "Connect Wallet" button for each available connector, which when clicked will trigger the connect method with the selected connector.
The useEffect hook is used to eagerly connect the first available connector if no wallet is currently connected.
helper.tsx
import {Buffer} from 'buffer'
import { Provider } from "starknet";
export const shortenAddress = (address:string) =>{
    if(!address) return null
    return `${address?.substring(0,6)}...${address?.substring(address.length -4, address.length)}`

}


export function feltToString(felt:any) {
    const newStrB = Buffer.from(felt?.toString(16), 'hex')
    return newStrB.toString()
}

export function stringToFelt(str:any) {
    return "0x" + Buffer.from(str)?.toString('hex')
}
Inside the helper.ts file are helper functions such as shortenAddress, feltToString, and stringToFelt.
The three functions shortenAddress, feltToString, and stringToFelt are helper functions used to manipulate strings and hexadecimal values in a smart contract.
shortenAddress takes an address as input, and returns a shortened version of the address, displaying only the first 6 and last 4 characters.
feltToString converts a hexadecimal value (felt) to a string representation. It does this by first converting the felt to a hexadecimal string and then using the Buffer class to convert the hex string to a regular string.
stringToFelt takes a string as an input and converts it to a hexadecimal value. It first converts the string to a Buffer and then converts the Buffer to a hexadecimal string, prefixing it with "0x".
import React, { useMemo } from "react";
import {
  Button,
  Container,
  FormControl,
  FormHelperText,
  FormLabel,
  Input,
  Text,
  VStack,
} from "@chakra-ui/react";
import { feltToString } from "../web3/helper";
import BigNumber from "bignumber.js";
import {  useState } from "react";
import Header from "../common/Header/Header";
import abi from "../web3/abi.json";
import { address as contractAddress } from "../web3/constant";
import {
  useAccount,
  useContract,
  useStarknetCall,
  useStarknetExecute,
} from "@starknet-react/core";


export default function Home() {
  let [recipient, setRecipient] = useState<string>("");
  let [amount, setAmount] = useState<string>("");
  const [receiver, setReceiver] = useState("");
  const [token, setToken] = useState("");

  const handleChange = ({ target }: any) => {
    const elementName = target.name;
    const value = target.value;

    switch (elementName) {
      case "address":
        if (value === "") return setRecipient("");
        else if (value) return setRecipient(value);
      case "amount":
        if (value === "") return setAmount("");
        else if (value) return setAmount(value);
      case "receiver":
        if (value === "") return setReceiver("");
        else if (value) return setReceiver(value);
      case "tokenAmount":
        if (value === "") return setToken("");
        else if (value) return setToken(value);
    }
  };

  const { address } = useAccount();
  const { contract } = useContract({ abi: abi, address: contractAddress });

// Read Transactions
  const { data, loading: balLoading } = useStarknetCall({
    contract,
    method: "balanceOf",
    args: [address],
  });
  const balance = data ? parseInt(data[0].low.toString()) : undefined;

// fetch name
  const { data: nameData, loading: namLoading } = useStarknetCall({
    contract,
    method: "name",
    args: [],
  });
  const name = nameData ? new BigNumber(nameData[0].toString()) : "";

// Write transactions

  const calls = {
    contractAddress: contractAddress,
    entrypoint: "mint",
    calldata: [recipient, amount, 0],
  };
  const {
    execute,
    loading,
  } = useStarknetExecute({ calls });

  const callsTransfer = {
    contractAddress: contractAddress,
    entrypoint: "transfer",
    calldata: [receiver, token, 0]
  }

  const {
    execute: executeTransfer,
  } = useStarknetExecute({ calls: callsTransfer });

  const handleMint = () =>{
    if (recipient !== "" && amount !== "") {
      execute();
    } else {
      alert("Both recipient address and amount must be filled in.");
    }
  }
  const handleTransfer = () => {
    if (receiver !== "" && token !== "") {
      executeTransfer();
    } else {
      alert("Both recipient address and amount must be filled in.");
    }
  };
  return (
    <>
      <Header />

      <Container marginY={"2rem"} maxW="container.lg" color="#262626">
        <Text
          className={`${balLoading && "animate-pulse"} ${
            !balance && "text-slate-400"
          }`}
        >
          Your Balance: {balance || 0}
        </Text>
        <FormControl marginBottom="1rem" isRequired>
          <FormHelperText
            className={`${namLoading && "animate-pulse"} ${
              !name && "text-slate-400"
            }`}
            marginY={".5rem"}
          >
            Pass in amount and mint {feltToString(name)} token
          </FormHelperText>
          <FormLabel fontWeight={600}>Mint Token</FormLabel>
          {loading ? (
            <p>loading....</p>
          ) : (
            <>
              <Input
                onChange={handleChange}
                marginY={"1rem"}
                type="text"
                name="address"
                placeholder="recipient"
                required
                value={recipient}
              />
              <Input
                onChange={handleChange}
                type="number"
                name="amount"
                placeholder="amount"
                required
                value={amount}
              />
              <Button onClick={handleMint as any} marginY=".5rem">
                MINT TOKEN
              </Button>
            </>
          )}
        </FormControl>
        <VStack>
          <FormControl isRequired>
            <FormLabel marginY=".5rem">Transfer Token</FormLabel>
            <Input
              onChange={handleChange}
              name="receiver"
              type="text"
              value={receiver}
              placeholder="address"
            />
          </FormControl>

          <FormControl>
            <FormHelperText>Amount of token to transfer</FormHelperText>
            <Input
              onChange={handleChange}
              name="tokenAmount"
              type="number"
              placeholder="amount out"
              value={token}
              isRequired
            />
            <Button
              onClick={handleTransfer as any}
              marginY=".5rem"
            >
              TRANSFER TOKEN
            </Button>
          </FormControl>
        </VStack>
      </Container>
    </>
  );
}
In the index.ts file, we will primarily focus on how to handle read and write transactions to the blockchain through the help of starknet-react;
The useContract hook from the starknet-react library is used to interact with the deployed smart contract on the blockchain. The hook takes an object with two properties as an argument, abi, and address.
The abi (Application Binary Interface) is a JSON representation of the smart contract's interface and contains information on the smart contract's functions, state variables, and events. This information is necessary for communication between the front-end and the smart contract. The address is the unique identifier of the smart contract on the blockchain.
The hook returns an object with a single property, a contract, which is an instance of the smart contract that can be used to call functions on the contract and get data from it.
With a decentralized application, we have two key operations: reading data from the blockchain and writing data to the blockchain to modify the state of the contract. The starknet-react library provides two APIs, useStarknetCall and useStarknetExecute, to simplify these actions. useStarknetCall hooks are used to perform a read-only contract call while useStarknetExecute is used to perform write transactions and also muticall actions.
Read transactions using useStarknetCall:
  const { data, loading: balLoading } = useStarknetCall({
    contract,
    method: "balanceOf",
    args: [address],
  });
const balance = data ? parseInt(data[0].low.toString()) : undefined;
The useStarknetCall hook from the library fetches the balance of an account. The hook makes a call to the smart contract specified by the contract object and executes the "balanceOf" method with the address as an argument.
The hook returns an object with two properties, data, and loading. data is an array that contains the returned data from the smart contract, and loading is a boolean indicating whether the data is still being fetched or not.
The balance of the user account is extracted from the returned data by parsing the first element of the data array and converting the low property to a string. The resulting string is then parsed into an integer and stored in the balance variable and rendered on the UI.
This code assumes that the "balanceOf" method in the smart contract returns a single value representing the balance of the StarkNet account in its specified token.
Write transaction using useStarknetExecute:
  const calls = {
    contractAddress: contractAddress,
    entrypoint: "mint",
    calldata: [recipient, amount, 0],
  };
  const {
    execute,
    loading,
  } = useStarknetExecute({ calls });
The useStarknetExecute hook from the library calls the "mint" entrypoint of the ERC20 smart contract. The hook takes an object with three properties, contractAddress, entrypoint, and calldata, as its argument.
contractAddress is the address of the deployed smart contract on the StarkNet network, entrypoint is the name of the entrypoint to be called, and calldata is an array that specifies the arguments for the entrypoint. In this case, the mint entry point is called with three arguments: recipient, amount, and 0.
The hook returns an object with two properties, execute and loading. execute is a function that, when called, executes the smart contract call, and loading is a boolean indicating whether the call is still in progress or not.
This code allows the user to call the "mint" entry point of a smart contract on the StarkNet network and pass in specific arguments to the entry point. The function returns the status of the call through the loading property.
In conclusion, this article outlines the steps involved in integrating an ERC20 token smart contract into a user interface using Next.js and the starknet-react library. It covers the installation of necessary tools, the design of the user interface, and the utilization of hooks from the starknet-react library to interact with the smart contract on the Starknet testnet.
The user interface includes functionalities such as rendering the connected wallet address, providing input fields for the minting and transferring of the ERC20 token, and using helper functions like shortenAddress, feltToString, and stringToFelt for manipulating strings and hexadecimal values in a smart contract.
The tutorial concludes by demonstrating the process of performing both read and write transactions to the blockchain using the useStarknetCall and useStarknetExecute hooks from the starknet-react library. The starknet-react library has other hooks available to be used based on the action you want your Dapp to perform. Check out the starknet-react documentation and also a link to the frontend project. Kindly engage in the comment section and feel free to reach out if you have any questions.